Do You Wanna Build a Snowman?
by Kelly Jones © August 2014
This Olaf pattern was created for the Kiss Looms 7th Anniversary party in 2014. I really hope you enjoy him - in summer and winter! Also take a look at this fun video of Olaf - In summer.
Loom needed: Kiss small gauge 2 way adjustable w/ 7 peg end pairs, 0 washers used
Supplies: pick, stuffing, poly pellets for weight, stitch holders, tapestry needle
Yarn: White – 250 yards (Patons Aran Style Fisherman Knit yarn used in sample – recommended for 7 mm knitting needles 19 sts=4”), Brown for arms (can also be used for eyes, mouth, hair and buttons) – 70 yards (Red Heart Super Saver used in sample), Blue for eyes, mouth, brows, hair and buttons – 25 yards (Red Heart Super Saver Navy used in sample), Orange for nose – 20 yards (Red Heart Super Saver Pumpkin used in sample)
Gauge: 4.5 sts x 5 rows per 1” Size: 15” H
See Notes section at end for techniques and abbreviations
double e-wrap cast on 36 pegs in the round – space these so you are working in the middle of the loom so you can increase on both sides.
Row 1-7 knit
Row 8 increase 2 pegs on right hand side slider (38 pegs)
Row 9-10 knit
Row 11 increase 2 pegs on right hand side slider (40 pegs)
Row 12-13 knit
Row 14 increase 2 pegs on left and 2 on right hand sliders (44 pegs)
Row 15-16 knit
Row 17 increase 2 pegs on right hand slider (46 pegs)
Row 18-19 knit Row 20 increase 2 left and right sliders (50 pegs)
Row 21-22 knit
Row 23 increase 2 right hand side slider (52 pegs)
Row 23 increase 2 right hand side slider (52 pegs)
Row 24-25 knit
Row 26 increase 2 left and right sliders (56 total pegs)
Row 27-28 knit
Row 29 decrease 2 right (54 pegs)
Row 30 knit
Row 31 start short row - knit 12 pegs wrap and turn peg 13
Row 32 knit peg 12-2 wrap and turn peg 1
Row 33 knit pegs 2-11 wrap and turn 12
Row 34 knit peg 11-3 wrap and turn 2
Row 35 knit pegs 3-10 wrap and turn 11
Row 36 knit pegs 10-4 wrap and turn 3
Row 37 knit pegs 4-9 wrap and turn 10
Row 38 knit pegs 9-5 wrap and turn 4
yellow pegs will have the wrap and turn
1 2 3 4 5 6 7 8 9 10 11 12 13
Row 39 knit pegs 5-10 knit 2 over 1 on peg 10
Row 40 knit pegs 9-4 knit 2 over 1 on peg 4
Row 41 knit pegs 5-12 knit 2 over 1 on pegs 11 and 12
Row 42 knit pegs 11-2 knit 2 over 1 on peg 2 and 3
Row 43 knit pegs 3-13 knit 2 over 1 on peg 13
Row 44 knit pegs 12-1 knit 2 over 1 on peg 1
Row 45 decrease 2 pegs on right knit row (52 pegs)
Row 46 decrease 2 pegs on left and right (48 pegs)
Row 47 decrease 2 pegs on left (46 pegs)
Row 48 decrease 2 pegs left and right (42 pegs)
Row 49 decrease 2 pegs on left (40 pegs)
Row 50 knit
Row 51 decrease 2 pegs on left and right (36 pegs)
Row 52 knit
Row 53 decrease 2 on right (34 pegs)
Row 54-55 knit
Row 56 decrease 2 left and right and 1 peg in the center on each side - (28 pegs) drawstring bind off
Carrot Nose
drawstring cast on 4 pegs in the round
drawstring cast on 4 pegs in the round
Row 1 knit
Row 2 knit
Row 3 increase 2 pegs each side
Row 4 knit
Row 5 knit
Row 6 knit
Row 7 increase 2 pegs each side
Row 8-13 knit
Row 14 increase 2 pegs on left 14 pegs
Row 15-17 knit
Row 18 decrease 2 on right
Row 19 decrease 2 on right and left
super stretchy bind off leaving long tail for seaming to large body
Mouth
double e-wrap cast on 12 pegs left to right
double e-wrap cast on 12 pegs left to right
Row 1-2 knit
Row 3 k1 k2tog knit
Row 4 k1 ssk k5 ssk k1
Row 5 k1
Row 6 k1 ssk k3 ssk k1
Row 7 k1
Row 8 k1 ssk k1 ssk k1
Basic bind off
Teeth 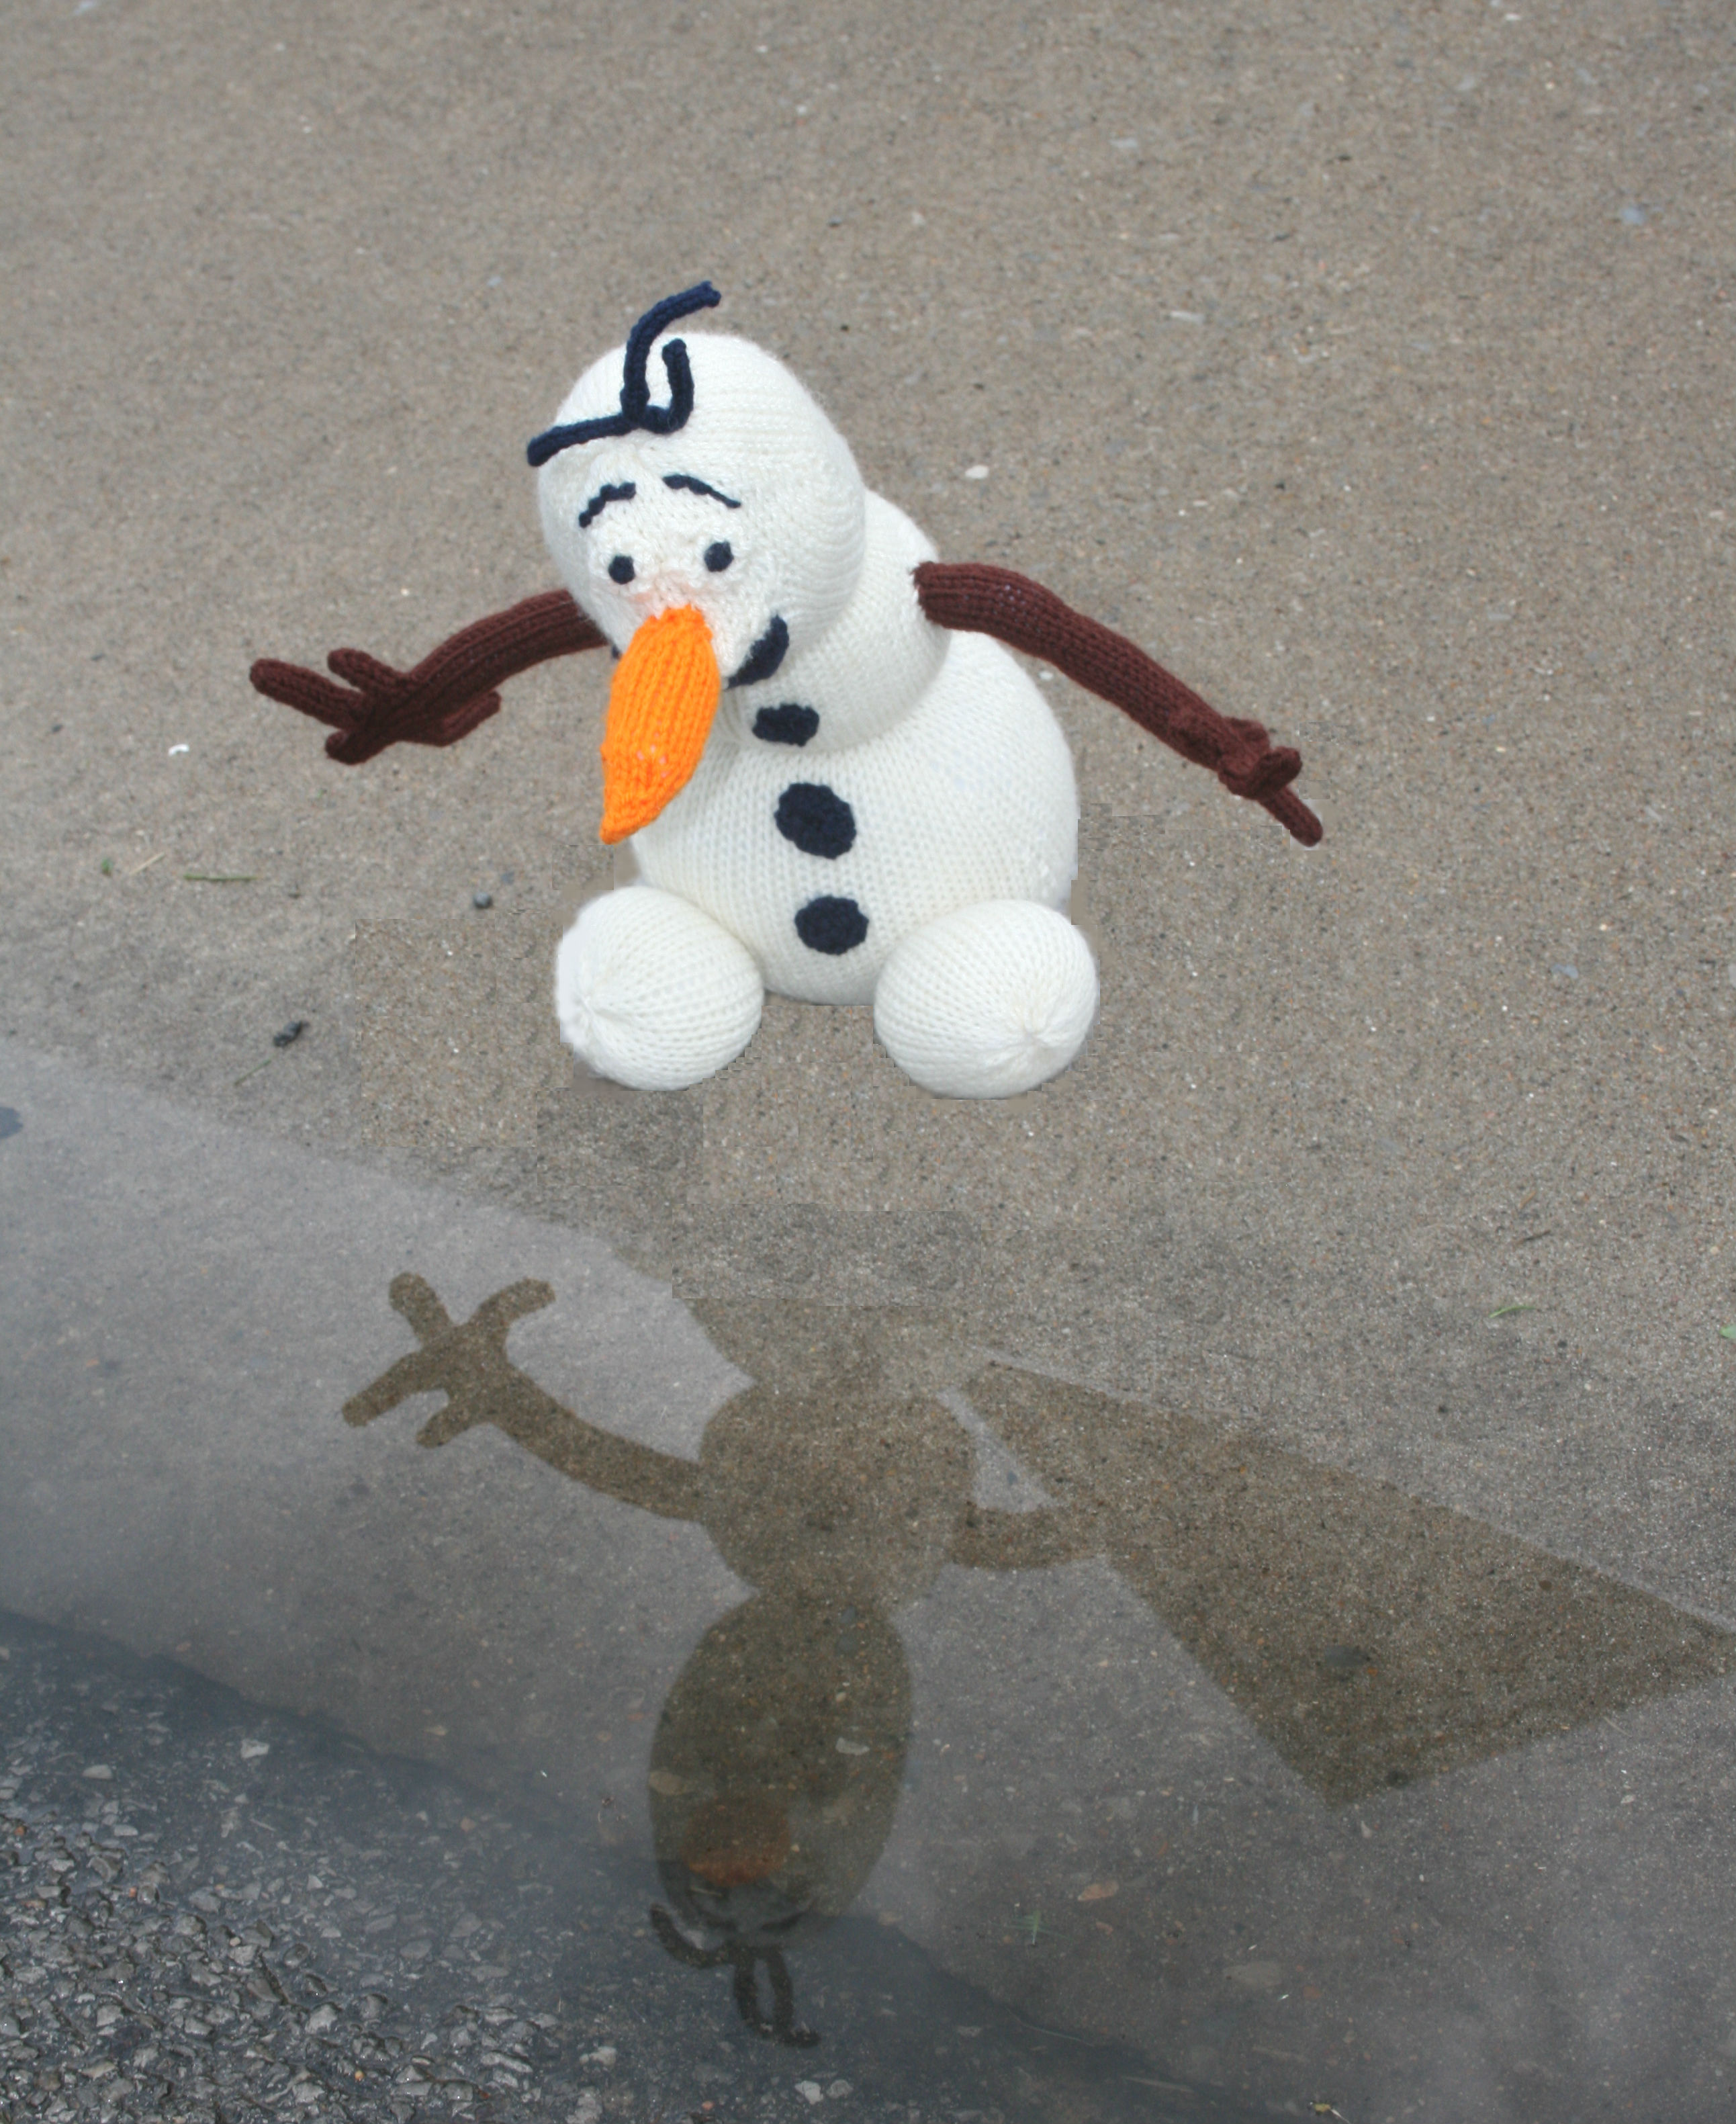
double e-wrap co 5 pegs on peg board only – do not use pins
double e-wrap co 5 pegs on peg board only – do not use pins
knit 2 rows
Basic bind off
Hair (make 1 of each)
3 peg i-cord on pegs only till 5” long
3 peg i-cord on pegs only till 5” long
3 peg i-cord on pegs only till 2” long
Eyes (make 2)
CO 3 pegs as flat panel
CO 3 pegs as flat panel
Row 1: p3, co 1
Row 2: k4, co 1
Row 3: p5
Row 4: k5
Row 5: p5
Row 6: k2tog, k, k2tog
Row 7: p3
Row 8: k3tog, pull through and snug
Small body
drawstring co 34 pegs in the round
drawstring co 34 pegs in the round
Row 1-8 knit
Row 9 increase 2 pegs left and right
Row 10 increase 2 pegs left and right
Row 11 increase 2 pegs left and right 46 pegs
Row 12 – 21 knit
Row 22 decrease 2 pegs left and right
Row 23 decrease 2 pegs left and right
Row 24 decrease 2 pegs left and right
Row 25- 32 knit
gather bind off leaving long tail for seaming to head
Large Body
drawstring co 46 pegs in the round
drawstring co 46 pegs in the round
Row 1-8 knit
Row 9 increase 2 pegs left and right (50 stitches)
Row 10 knit
Row 11 increase 2 pegs left and right (54 stitches)
Row 12 knit
Row 13 increase 2 pegs left and right (58 stitches)
Row 14 - 20 knit
Row 21 increase 2 pegs left and right (62 stitches)
Row 22 knit
Row 23 increase 2 pegs left and right (66 stitches)
Row 24 knit
Row 25 increase 2 pegs left and right (70 stitches)
Row 26 - 32 knit
Row 33 decrease 2 pegs left and right (66 stitches)
Row 34 knit
Row 35 decrease 2 pegs left and right (62 stitches)
Row 36 knit
Row 37 decrease 2 pegs left and right (58 stitches)
Row 38 knit
Row 39 decrease 2 pegs left and right (54 stitches)
Row 40 knit
Row 41 decrease 2 pegs left and right (50 stitches)
Row 42 knit
Row 43 decrease 2 pegs left and right (46 stitches)
Row 44 knit
Row 45 decrease 2 pegs left and right (42 stitches)
Row 46 knit gather bo leaving a long tail for seaming to small body
Feet (make 2)
drawstring co 28 pegs in the round knit 28 rows gather bind off leaving long tail for seaming to large body
drawstring co 28 pegs in the round knit 28 rows gather bind off leaving long tail for seaming to large body
Arms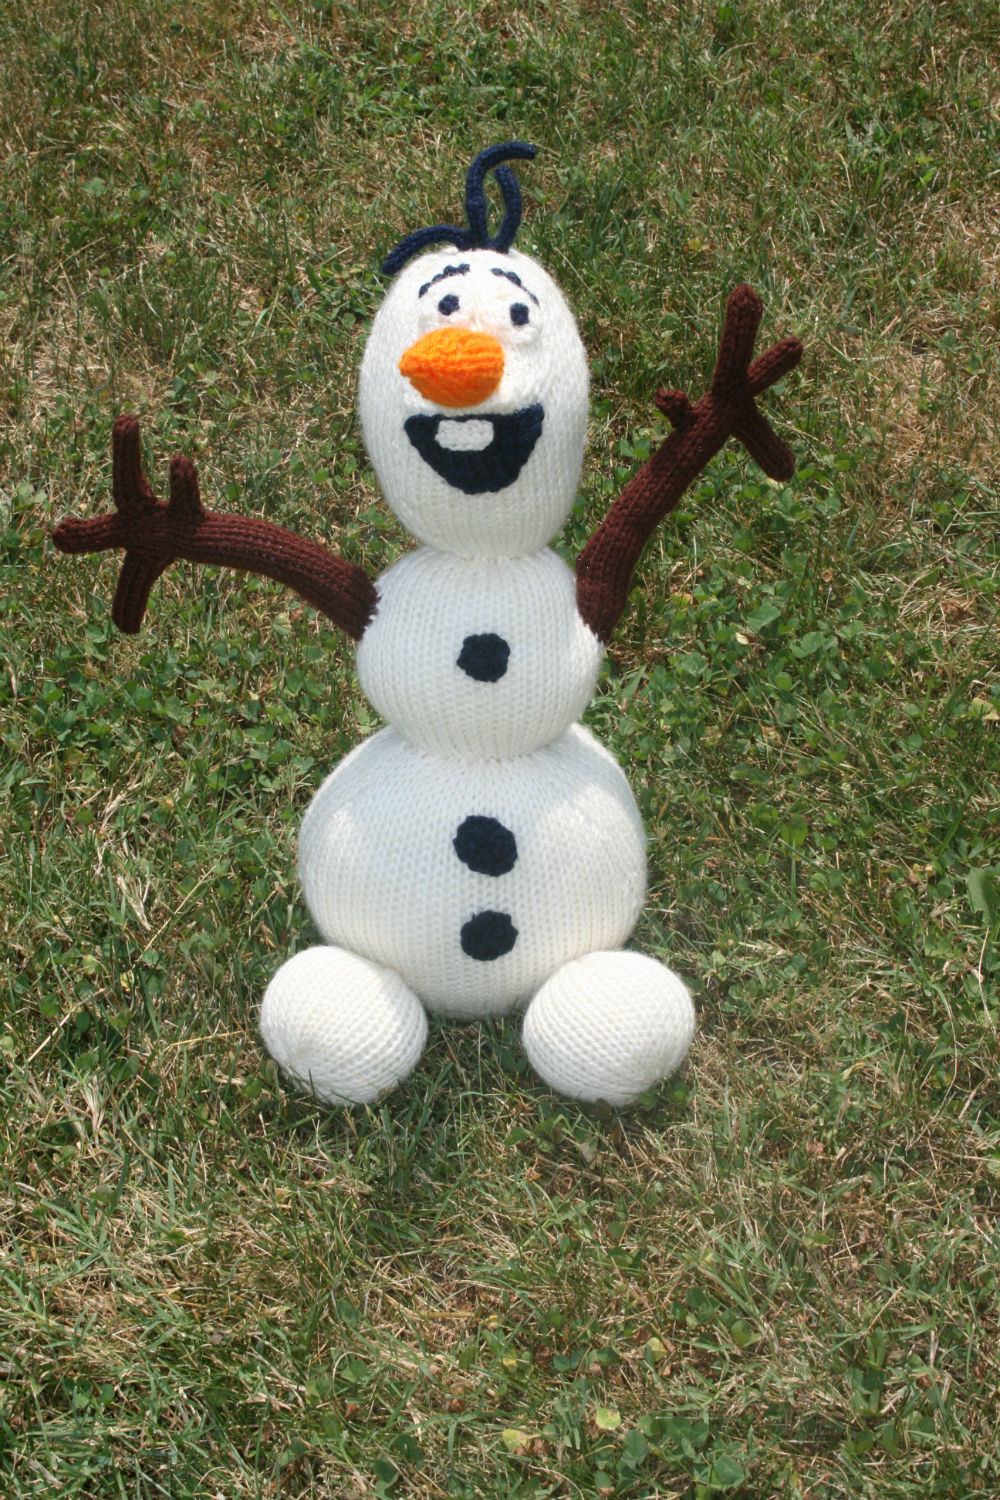
double e-wrap co 10 pegs in the round
double e-wrap co 10 pegs in the round
knit 30 rows
k2tog k1 k2tog k1 ssk ssk
k10 rows
gather bind off leaving long tail for seaming to small body
Small Fingers (make 2)
double e-wrap co 4 peg icord with pins
double e-wrap co 4 peg icord with pins
knit 5 rows
gather bind off
Large Fingers (make 4)
double e-wrap co 6 pegs
knit 10 rows
gather bind off
Small Buttons (make 2)
CO 3 pegs as flat panel
CO 3 pegs as flat panel
Row 1: slp p2, co 1
Row 2: slp k3, co 1
Row 3: slp p4
Row 4: slp k4
Row 5: slp p4
Row 6: k2tog, k, k2tog
Row 7: p3
Row 8: k3tog, pull through and snug
Large Button
CO 4 pegs as flat panel
CO 4 pegs as flat panel
Row 1: slp p3, co 1
Row 2: slp k4, co 1
Row 3: slp p5
Row 4: slp k5
Row 5: slp p5
Row 6: k2tog, k2tog, k2tog
Row 7: p3
Row 8: k3tog, pull through and snug
Assembly
You may want to do some assembly as you go along. It's a lot more fun this way and you can make sure none of the parts wander off.
You may want to do some assembly as you go along. It's a lot more fun this way and you can make sure none of the parts wander off.
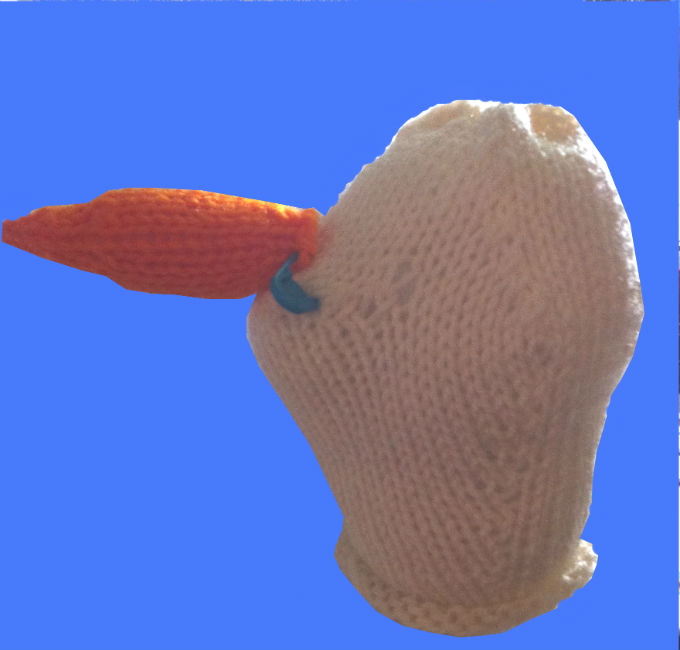
Head – Stuff till you feel like you have the shaping that you want out of the face – particularly the area where the nose attaches. It's best to have the nose made when you do this part to make sure of the look. Do not stuff this area to full – let it keep the shape of the short rowing.
Nose – Stuff the nose lightly – just enough to give it shape and not make it heavy. Stitch the open end to the face at the top of the short row ledge. See photo from head instructions for placement. Squish the face around a little to you get it how you like it.
Small body - Next gather one end of the small body and stitch closed. Stuff the small body leaving a little bit of room. Then push the bottom of the head inside the small body opening and cinched closed. Use the remaining tail to stitch the small body to the head. It's ok to make two passes – start up close to the underside of the head then you can work a second round a little further out till the shape is correct.
Large body - The large body is gathered off on one end and stitched closed before seaming to the small body. The bottom end is left open at this time! Seam the small and large bodies together. Again you may want to start up closer and do a second pass before you are done. I actually did a third pass after the feet were attached to help him to sit up better (he was a bit top heavy so I just stitched the front belly area a little further out and it was perfect). The bottom of the large body is left open so that you can add a stocking filled with poly pellets in the bottom for weight (he really needs this to help him sit up better). I used 1- 6 oz package in a piece of hose that I knotted off. Once this is placed in the bottom put a small layer of stuffing over and around it and close up the bottom and seam shut.
Feet – Gather one end of the feet and stuff. Cinch the other end closed and seam. Set up your Olaf body and determine placement of the feet. Make sure to put them a little to the side and not directly in front. You can seam these looser than the other body parts. The feet on mine will flop down slightly when he is picked up (no they don't go to a standing position).
Eyes – Stitch the eyeball in place using the method described below in the notes section. Determine placement of eyes and stitch in place.
Eyebrows – Stitch the eyebrows in place using the back stitch method described in the notes section.
Teeth – Stitch the teeth in place on the mouth leaving a small line of blue showing above the white.
Mouth – Stitch the mouth in place making sure to pull at the corners to stitch in place and pull towards the bottom to get the appropriate shaping.
Hair – Take the longer strand of hair and fold it into 2” and 3” sections. Stitch down to top of head with the 3” section in the middle. Place the 2” strand close to the base of the 3” tall section and seam in place.
Arms – Stitch the large fingers on either side of the single finger on the arm. It's ok if this flattens it out a bit – this will form a bit of a palm for him. Just try not to seam all the way through to the other side. The fingers are not stuffed! Stitch the small finger on the top edge of the arm. Stuff the arm till it can stand out straight and not be floppy. Seam to the small body.
Buttons – Stitch in place, 1 on the small body and two on the large body.
Abbreviations:
K- knit with the u-wrap stitch unless otherwise noted
P – purl
CO – cast on, use dbl ew co unless otherwise noted
K2tog/K3tog – knit two/three together (see general notes)
P2tog/P3tog – purl two/three together (see general notes)
BO – bind off, basic bind off or super stretchy bind off as noted
SLP – slip stitch with working yarn in back– in other words, do not knit it
KO – knit off
Notes:
Drawstring Cast On (DSCO) in the Round
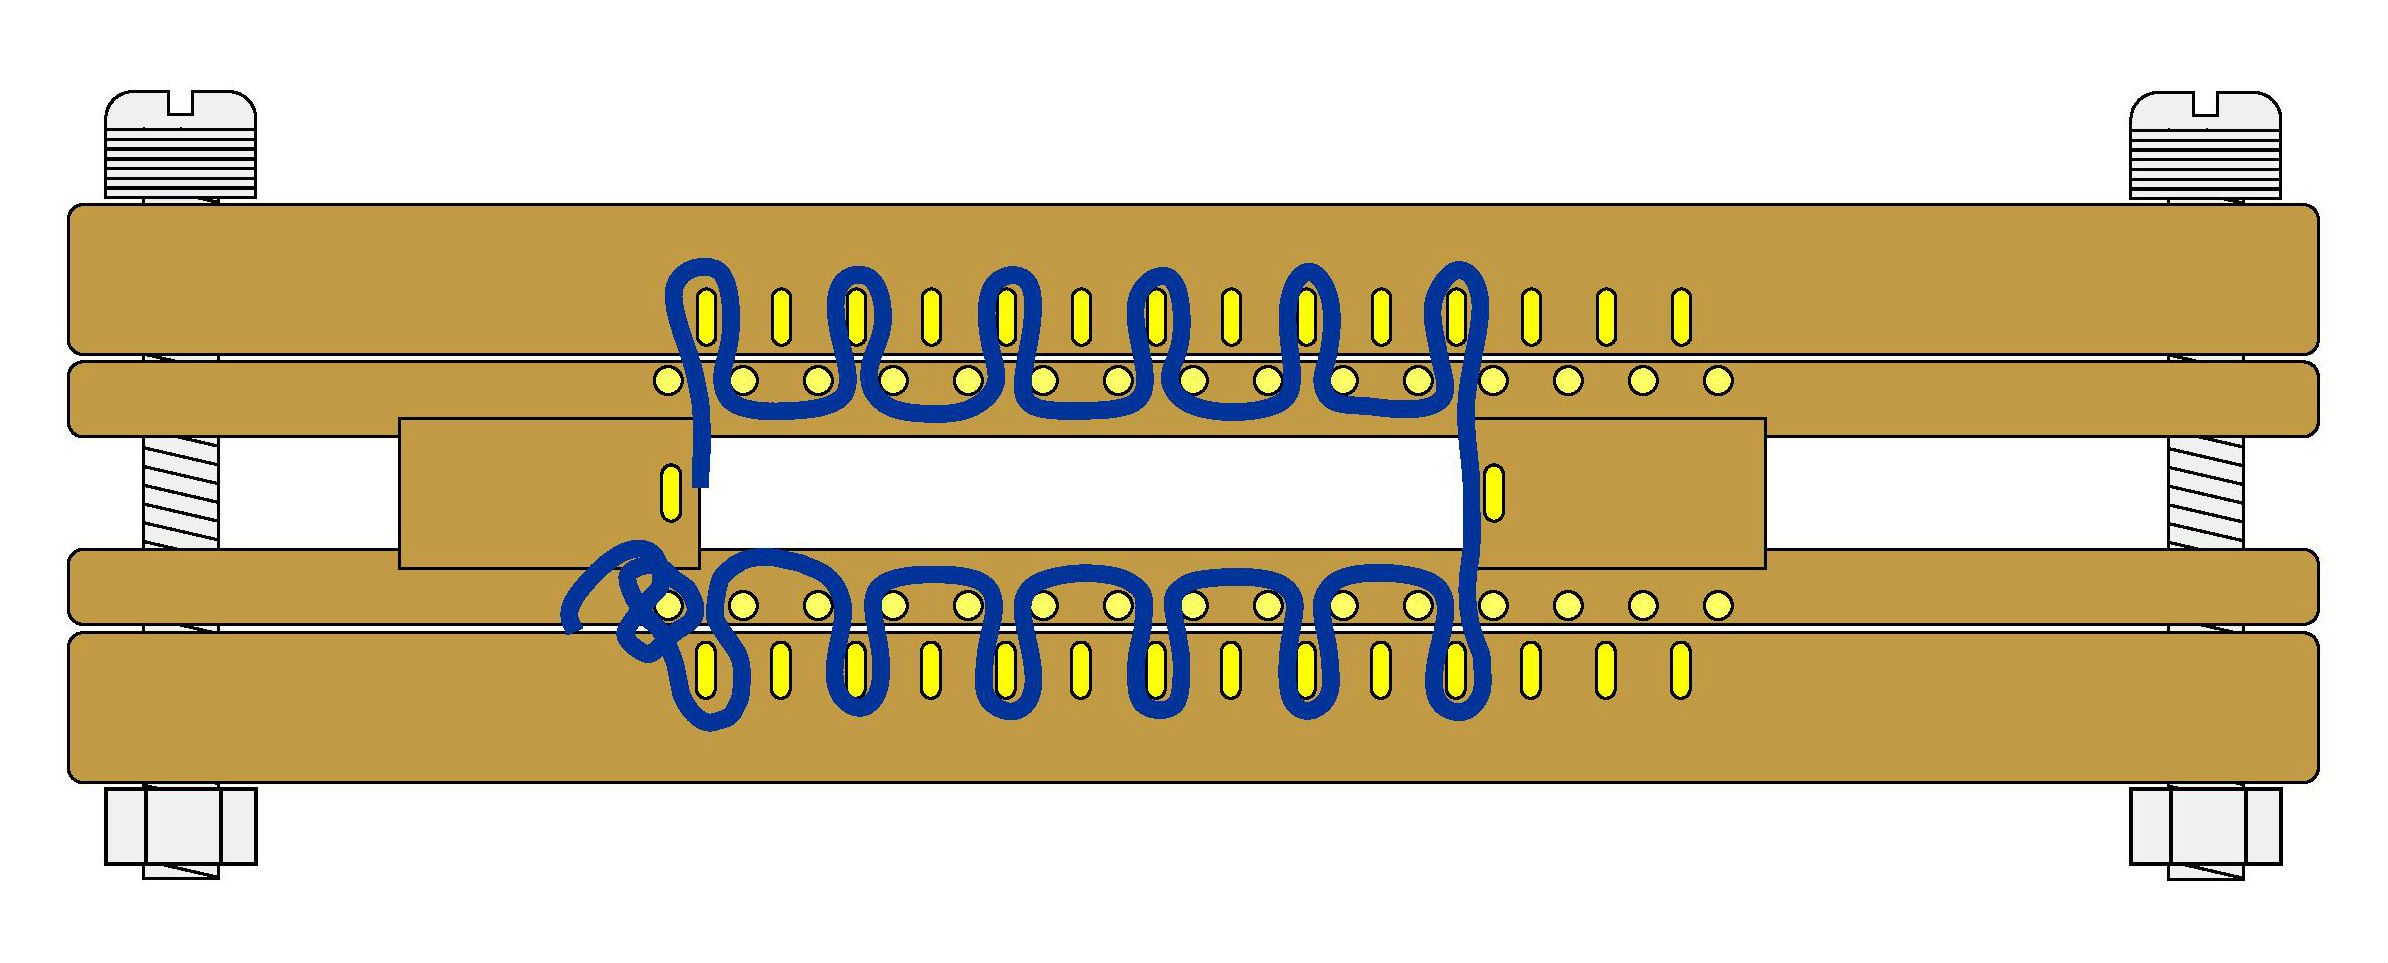
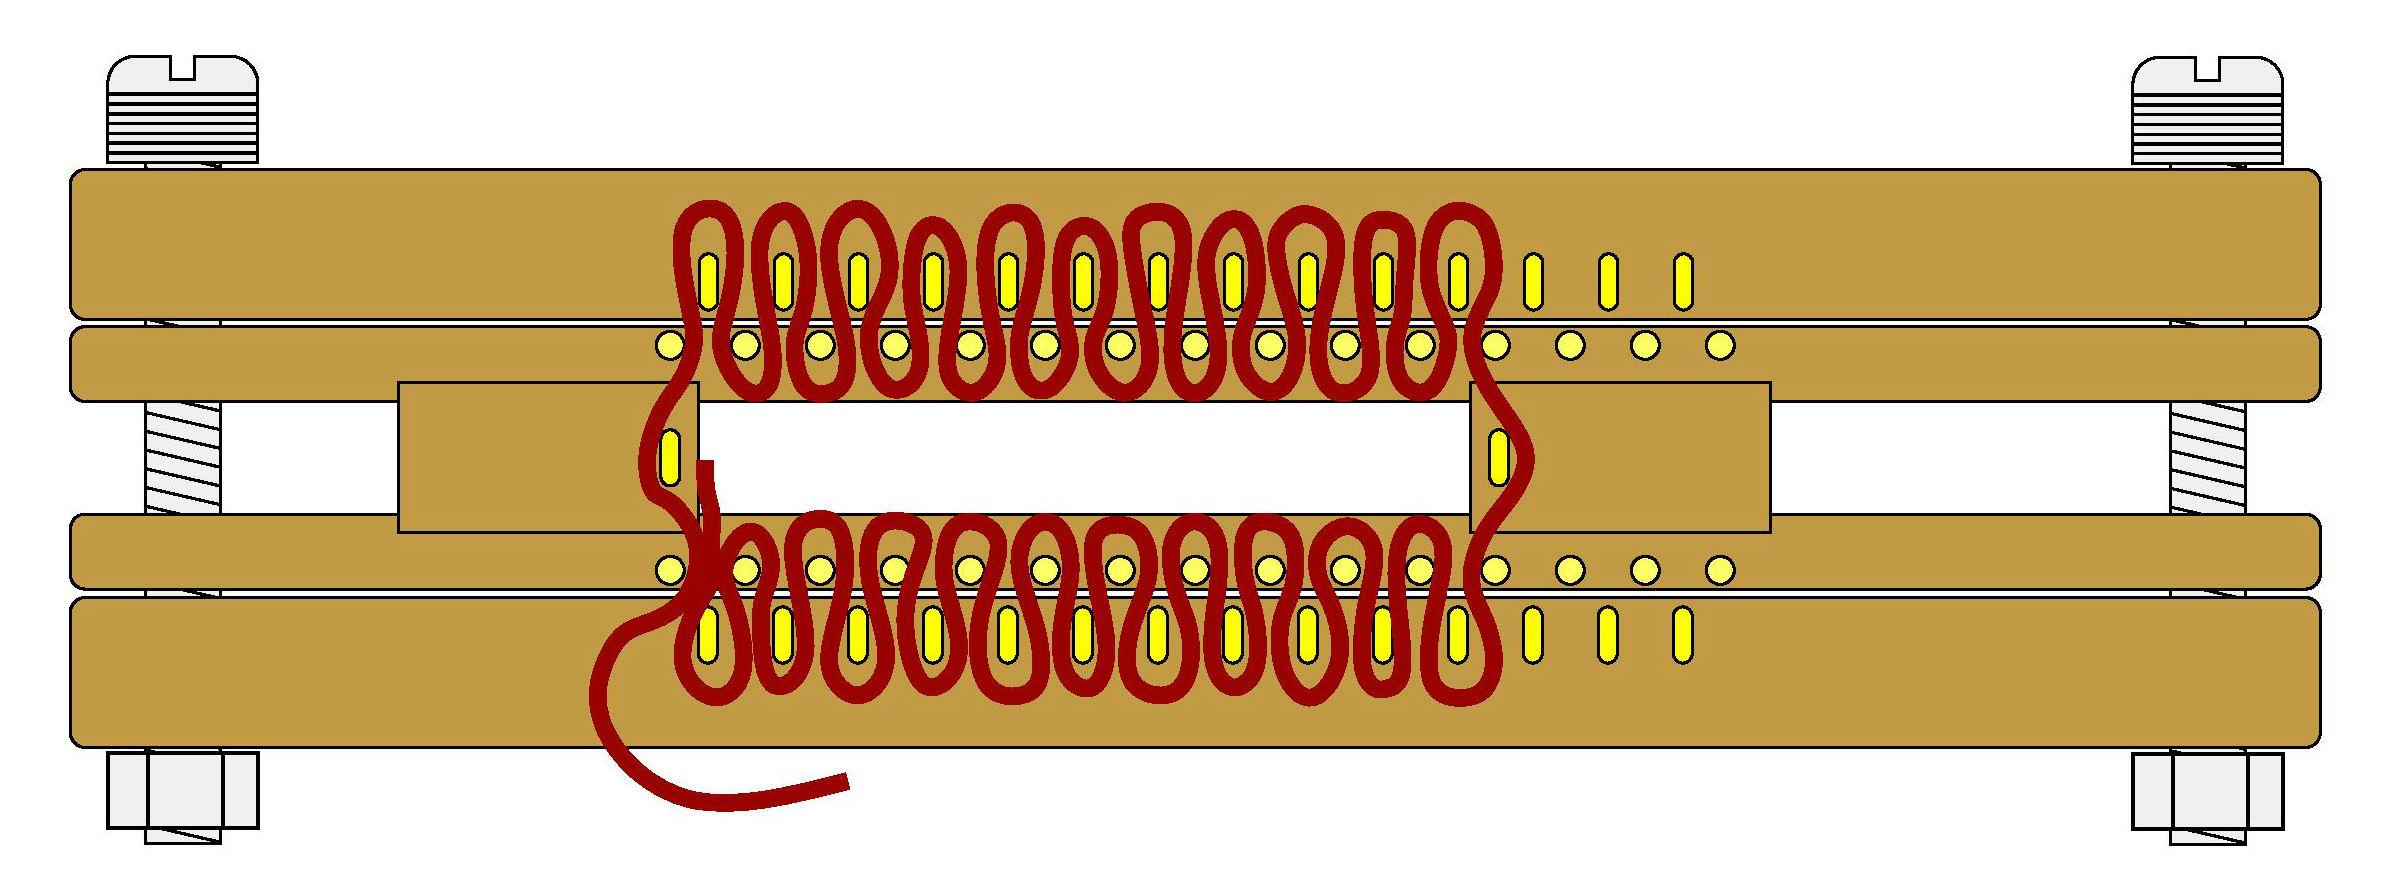
The drawstring cast on in the round is accomplished by knitting every other peg on the first row, then knitting every peg on the second row. You will then knit off the pegs that have two loops. I always choose a corner pin to place a slip knot on to hold it while doing the cast on. You do not want to slip knot the first peg because you won't be able to gather it closed correctly when you are done.
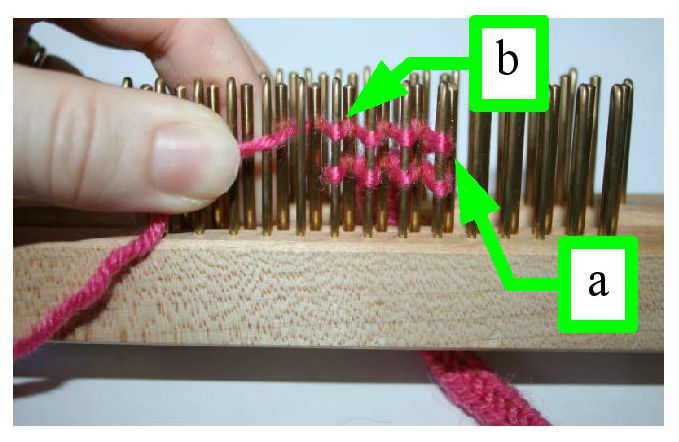
How to knit a flat panel i-cord
When knitting a flat panel i-cord you do not knit back and forth like regular knitting. I typically cast on from right to left. You then go behind all the pins and pegs back to the right hand side (a) and do a u-wrap stitch from right to left (b), knit off starting with the pegs on the edges, then knit off the middle pegs. Go behind all the pins and pegs again to the right hand side (a). You do this each time. Pull down after each row and you will see the gap on the back side close up, forming a rounded i-cord.

How to sew facial features
The main thing to remember is to work in small increments and that if you don't like it you can always change it. The face is an important feature and you need to be happy with the results. Sometimes it takes a few tries before you get one you like.
The main thing to remember is to work in small increments and that if you don't like it you can always change it. The face is an important feature and you need to be happy with the results. Sometimes it takes a few tries before you get one you like.
There are a few different methods for putting the eyes on. There are some great resources for this online too. I highly recommend taking a look at Mochimochi Land for a thorough tutorial (mochimochiland.com/2008/07/eye-eye-a-tutorial/)
First sew an outline using the back stitch method described in the notes section. Once the outline is done, begin filling in the middle of the eye ball a little bit at a time until the white is gone.
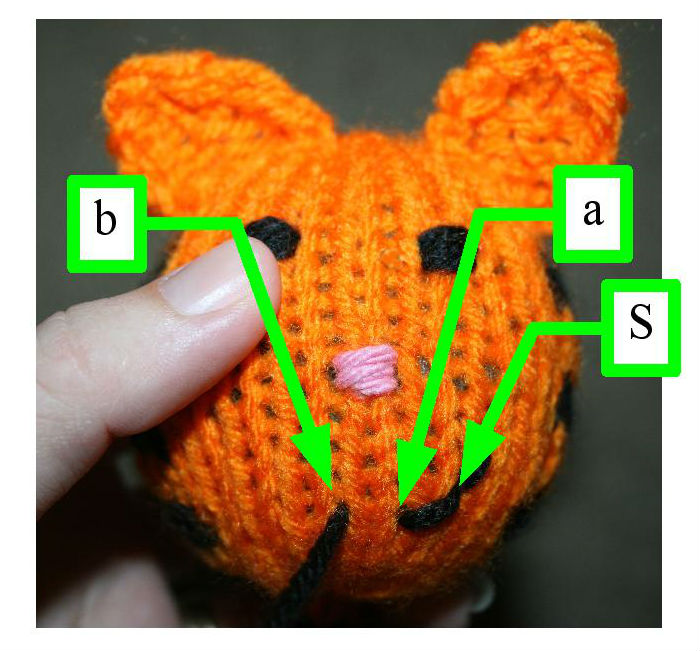
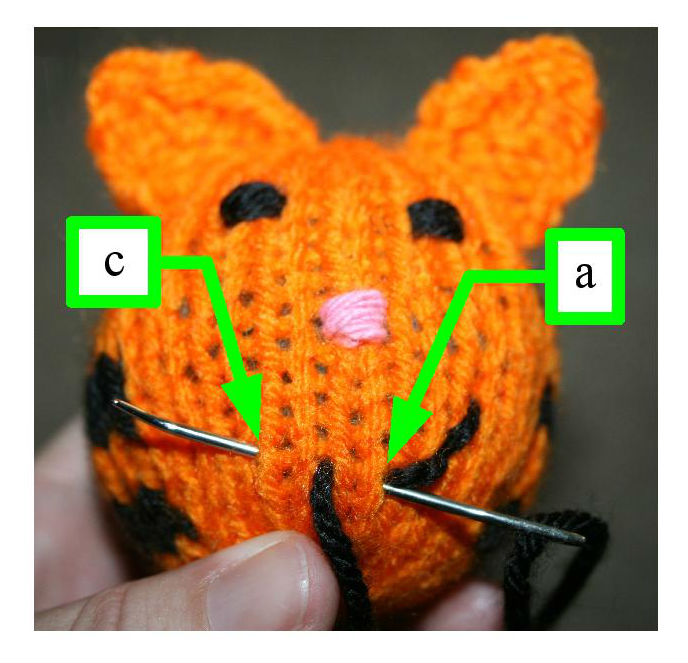
For the brow of Olaf it is best to use the sewn back stitch method. You can find many videos online that show this method really well. Although the example below is for a tiger mouth the idea is just the same. Let's say you are forming the brow right to left. First you will bring the yarn up at the location you want the brow to start (S) then bring it down two stitches over to the left (a) and underneath two more stitches to the left (b). You then bring the needle down through the hole of the previous stitch (a) filling in the line you missed and underneath 4 stitches to the left (c). Continue in this manner until the brow is formed. It is important to keep the stitches the same length.